Tutorial - Switching from Vi/Emacs to Eclipse using SVEditor
Background
This tutorial is intended to help an HDL user transition to using Eclipse with SVEditor as a plug-in. The tutorial will cover setup and installation of SVE and then take you through a quick tour of what Eclipse offers you over and above a normal editor like VI / EMACS.
First off Eclipse is an IDE, as opposed to an editor. Hopefully as the tutorial progresses the distinction will become more clear, but in it's simplest terms, an IDE is aware of the all the files in the project, and not just the file(s) that is/are open. It is also truly syntax aware, highlighting errors as you type, no more waiting 5 minutes for a compile to complete to discover you missed a semi-colon!
Another perk for us RTL designers, you are no longer necessarily limited to Windows / Unix / Linux / Apple. You can work wherever you want and have the same experience. Personally I have Eclipse running on a Windows XP machine and my Linux box. I have the same user experience in either environment.
User Beware
Eclipse is to Vi/Emacs what Vi/Emacs is to Notepad. This is good news. That said, this is a significant jump in functionality, and will take a bit of getting used to.
It is going to take a little while to re-train your fingers. There are GOING to be functions that you are used to using that you either behave differently, or, occasionally are missing entirely in Eclipse. I am going to say that by the same token I have found things in Eclipse that my previous editor didn't have. In my experience, Eclipse brings enough "good" that it significantly outweighs the "bad".
Table of Contents
-
Tutorial - Switching from Vi/Emacs to Eclipse using SVEditor
- Background
- User Beware
- Table of Contents
- Installing Eclipse
- Loading Your First Project
-
Playing with your New Project
- Basic Key bindings
- Opening Files
- Outline View
- Instantiating a Module, Function or Task - Ctrl+Space
- Instantiating Common Constructs - Ctrl+Space
- Class Member Instantiation
- Code Completion - Alt+/
- Indentation - Ctrl+I
- Commenting out code - Ctrl+/
- Opening a Random file in the Environment - Ctrl+Shift+R
- Code Browsing
- Splitting Windows
- Find & Grep
- Column Mode
- Diff'ing files
- Documentation pop-ups (DocHover)
- Multiple Projects & Environment Variables
- Code Checking as you Edit
- Buffer Management
- Project Management
- Other Stuff
Installing Eclipse
There are several ways of installing Eclipse and the SVEditor plugin for Eclipse. These are detailed on the Installing SVEditor page. This tutorial focuses on downloading Eclipse from the Eclipse site, and then installing the SVEditor plugin as a seperate step.
The two alternative methods are:
- Installing a version of Eclipse that comes pre-packaged with SVEditor (arguably the simplest way to get going)
- Installing DVKit, which is an installation that not only includes SVEditor as a part of the Eclipse installation, but other plugins commonly used by designers (such as TCL, Shell scritps etc.).
Installing Eclipse from Eclipse.org
Download a version of Eclipse from http://eclipse.org/downloads/. Any of them will do. If you do more C++ than Java, use that version. If you don't know what to do, Eclipse Standard will work just fine. Eclipse is usually just a zip file, which you extract. At the top of the extracted data, there is an executable (called eclipse). Just run it and eclipse should launch.
You will first be to select a "workspace". To all intense purposes, a workspace is a place where Eclipse
- Stores project information
- Stores preferences (key bindings, colors, etc.)
- Does it's caching (more on this later)
- Keeps track of a list of open files, window layouts, repository configurations etc.
- This should NOT be where your RTL lives. Place this in your home area (usually the default).
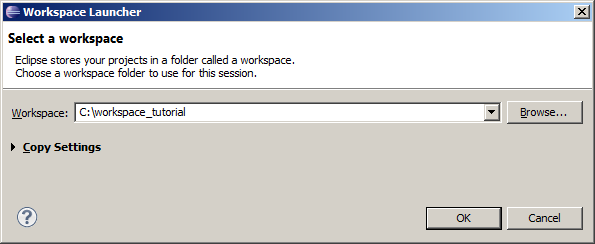
Once a workspace has been selected, the Eclipse startup screen shown below comes up, and is the least intuitive thing I have seen in a long time. Best to kill this window and move on (hit the "X" circled at the top of the welcome tab in the picture below).

Installing the SVEditor Plug-in
Now it is time to install the SVEditor plug-in.
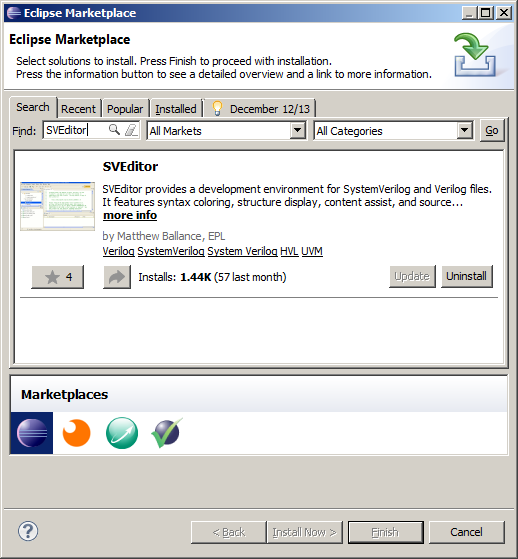
- This can be installed from the Eclipse Marketplace as follows:
- Help>Eclipse Marketplace
- Once this dialog is up, search for and install the SVEditor plug-in as shown below.
- Next, Accept/Finish your way through this process.
- Once done, you will be prompted to restart Eclipse, do so.
Opening the SVEditor Perspective
What is a perspective? In its simplest terms a perspective is a combination of:
- Window layout
- Menus
That are applicable for a given task. When doing java programming, you'll commonly switch between a JAVA perspective (where the window layout is primarily dominated by your code) and a DEBUG perspective where the window layout is likely dominated by Watch windows, Breakpoint lists, console etc.
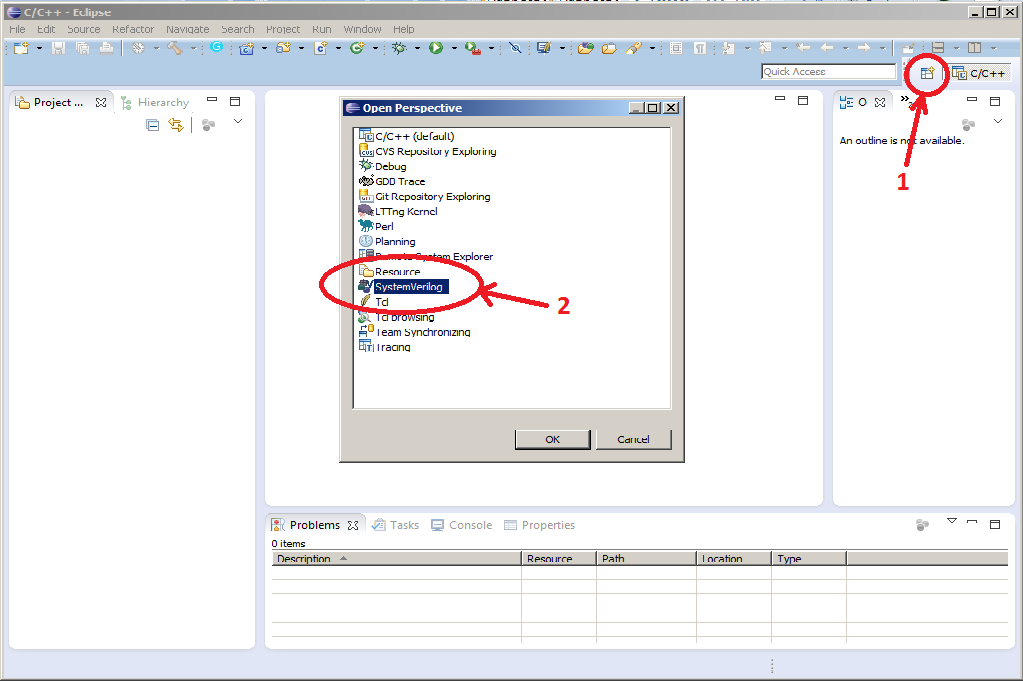
To open the SVE perspective Window>Open Perspective>Other>SystemVerilog. You can also open the System Verilog perspective using the icon in the picture below. Unused perspectives can be closed by right-clicking on the perspective and hitting "Close".
Loading Your First Project
The following zip file contains two "dummy" chips, chip1 and chip2. These could be chips, modules, or any other piece of IP.
- Download the zip file
- Unzip the source code to the following location, "C:\<some_place_other_than_workspace>\Tutorial". You should have 2 top level folders - chip1 & chip2
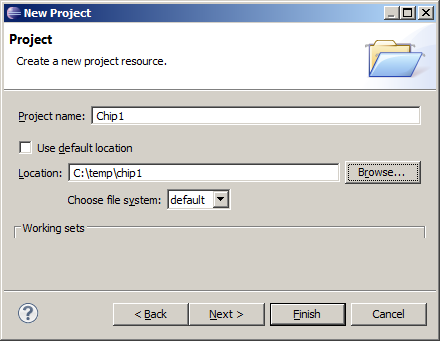
- Start a new project:
- File>New>Other>General>Project
-

- "Next"
- Set the Project name to Chip 1
- Un-check Use Default Location
- Browse to the un-zipped project location, in this case:
- "C:\ <some_place_other_than_workspace>\chip1"
- Hit Next
-
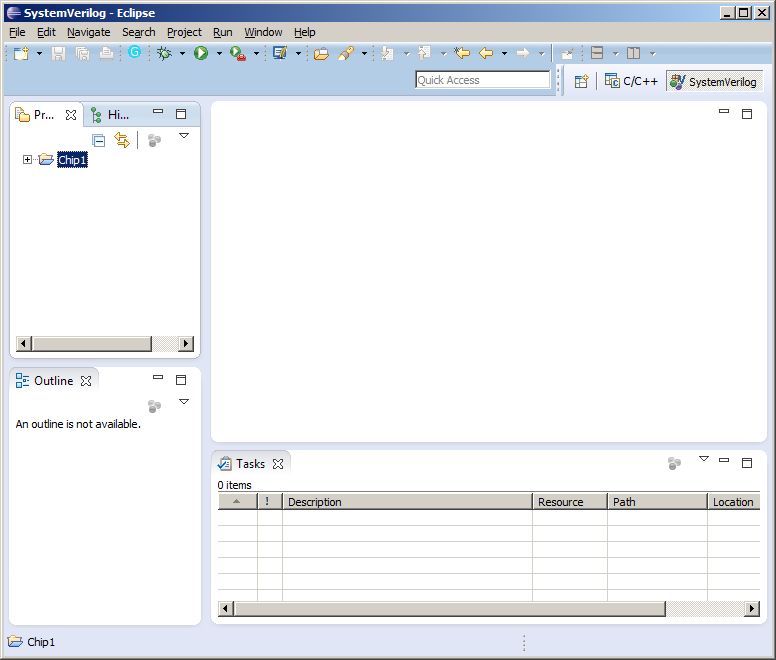
- Hit Finish (no referenced projects)
- Eclipse will scan the file system, creating an inventory of all files from
chip1 down.
-
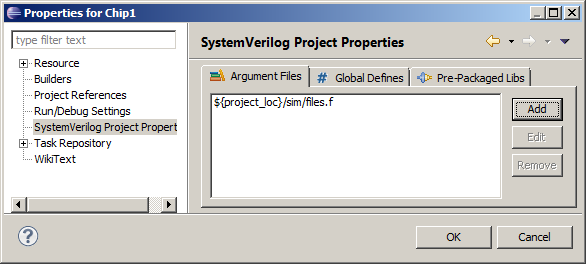
- At this point you need to give Eclipse the information it needs to properly parse your design. This is usually some sort of ".f" file. Depending on your place of work you may have one or more of these. In this tutorial there is a single .f file.
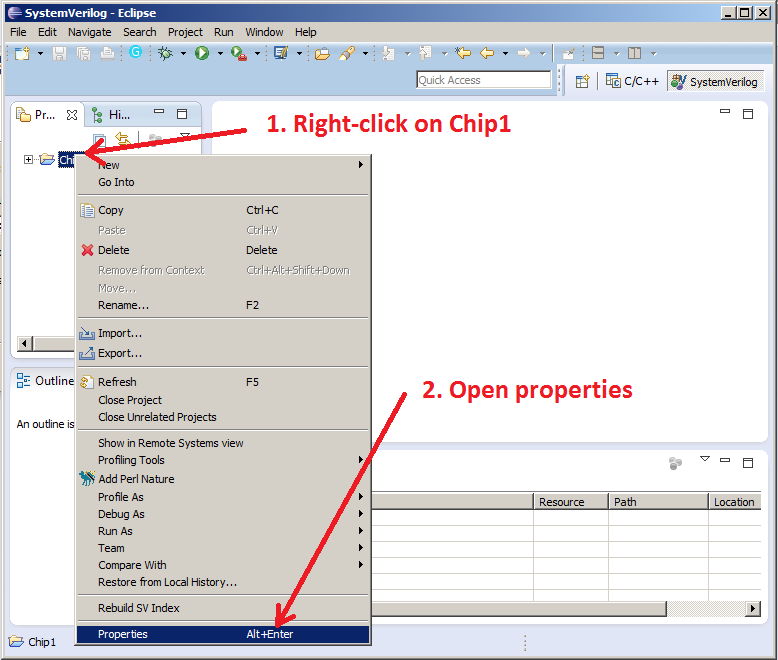
- Right click on "Chip 1" and go to Properties
-
- Click on
System Verilog Project > Argument files> Add>Add Project Path Browse your way to
chip1/sim/files.f
-
- Hit OK
At this point, Eclipse knows what files matter to your design, and parses them appropriately.
Setting Environment Variables
Now to set up some environment variables for the project. This step isn't strictly necessary. Eclipse will look for variables in the environment if they aren't set in a project file. Often times though, environment variables are used to distinguish between user areas, where all paths will typically be relative to a given spot within a user area (sandbox etc).
More on this later. For now though, we are going to set an environment variable that chip1 uses in it's files.f.
- Open the project properties by right clicking on the Chip1 in the
Project Explorer > Properties
- Why would we want to set environment variables in Eclipse? Depending on your work environment you may or may not need to. In its simplest case, if your file system is on a linux drive, and you usually work on a linux drive, your paths in files.f will look something like "/home/data/chip/top.sv". If you were trying to use Eclipse on a Windows machine, the equivalent path would look something like "L:\chip\top.sv". By setting an environment variable, $PATH_TO_CHIP in your files .f - which would look like "$\{PATH_TO_CHIP\}/chip/top.sv" you'd be able to use the same files.f in both Windows & Linux.
-
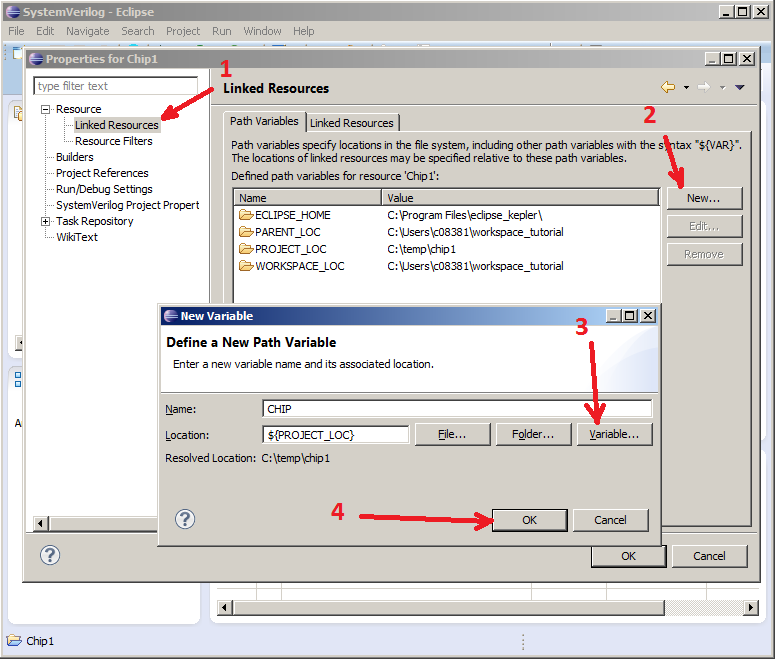
- Open the Linked resources Resource>Linked Resources> Path Variables>New
- We are going to set what is a project environment variable called "CHIP". Chip is used by files.f and is the root of the project.
-
- At this point you will have a screen that looks something like this
-
Compiling (Indexing) your Code
Eclipse is aware of more than what is required to do basic code colorization. Eclipse is aware of your design hierarchy, class hierarchy and so on. To do this Eclipse needs to compile your code. The compiled output will be stored in your workspace (note that this is not the same location as where the project is stored) leaving your user area unaffected.
As you work (type) Eclipse will continually update the index, so you do not need to re-compile each time you edit your code. This is done in real time after an initial compile.
You can force a re-compile at any time, simply by following the same step you follow to compile your code in the first place:
- Project>Clean
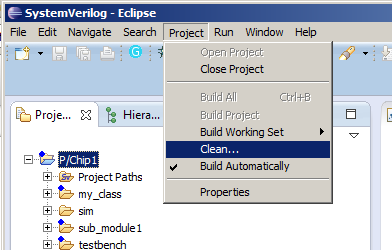
Congratulations. You've just loaded and compiled your first project bit of Verilog code!!!
Terminology Note: SVEditor stores the compiled code in an Index, hence the fact that index is used somewhat interchangeably with compile.
Playing with your New Project
Basic Key bindings
In its simplest terms, editing in Eclipse is the same as editing in any Microsoft product (no, don't run away screaming, it isn't that bad, there are alternatives. I ask that you bear with me for now.)
Here are some common key bindings that will get you around for now:
| Key binding | Command |
| Shift-Arrow, CTRL-SHIFT-Arrow | Select Text |
| Ctrl-C, Ctrl-X, Ctrl-V | Copy, Cut, Paste |
| Ctrl-Z, Ctrl-Y | Undo/Redo |
| Ctrl-E, Ctrl-Tab, Ctrl+Shift+Tab, Ctrl-Shift-E, Ctrl-Shift-R | Buffer and File management - Try them all when you have a bunch of files open |
| Ctrl-F, Ctrl-J, Ctrl-H | Find, Incremental Search (search while I type), Find & Grep |
Opening Files
There are many ways of opening files. The obvious one is to use your mouse! You can mouse through your hierarchy in the "Project Explorer" view that comes up on the left hand side of the screen, expanding and collapsing directories.
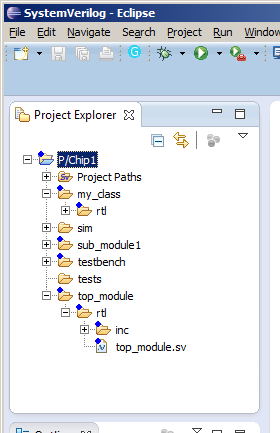
Now for something fun. Type Ctrl-Shift-R, and start typing the name of the file you are looking for (in this case type "*mod").
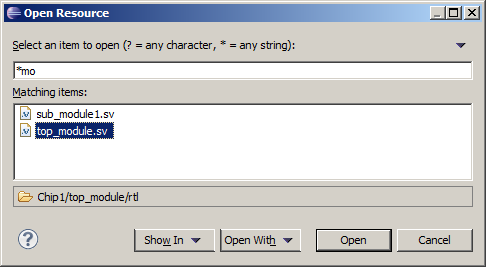
Note that eclipse will filter all files in your project, narrowing your choices down as you go. Wildcarding etc makes finding a file anywhere in your design a breeze. Where I work we have a naming convention where the module name must match the file name. This makes it really easy to open up any module in the design.
Eclipse does a great job of parsing your directory tree to find all the files in it, and creates a really fast index of files. No more browsing through the entire hierarchy as you switch files in your project!!!
Outline View
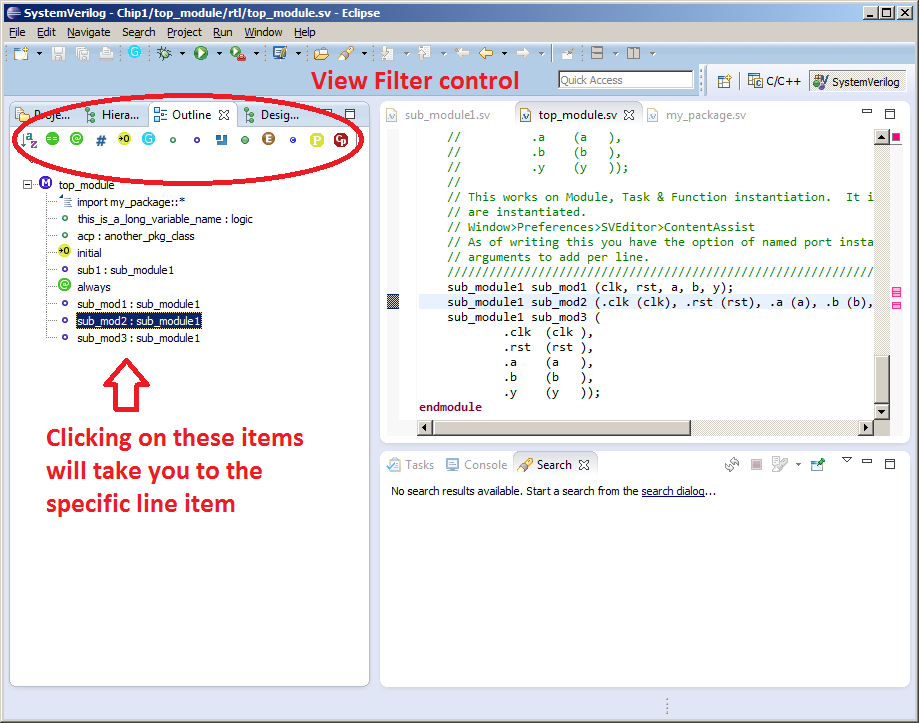
The outline view is a birds-eye view of items within a given file. There are a number of icons on the top of the view that allow you to filter out various constructs. For instance, always blocks are typically not named, so including these in an outline view is just clutter. Module instantiations on the other hand are useful. Clicking on items within the outline view will take you to that location in the file.
- Open up top_module:
- Ctrl+shift+R, top_module.sv
- Bring up the outline view (this is likely already up)
- Window>Show View>Other>General>Outline
-
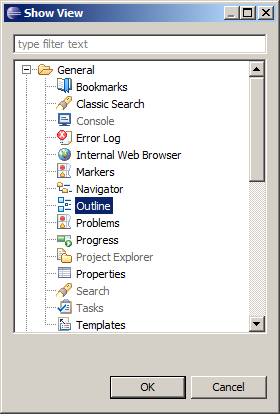
- Click on various items in the outline view, turn items off on the icons at the top of the view
-
Instantiating a Module, Function or Task - Ctrl+Space
The goal of this exercise is to instantiate a sub-module (called sub_module) in the design. To instantiate a sub-module:
- Open "top_module.sv"
- Keystrokes: Ctrl-Shift-R, "top_module.sv"
- Open "sub_module.sv"
- Keystrokes: Ctrl+Shift+R, "sub_module.sv
- Note that this could have been done by wildcarding \*mod\* and selecting both modules simultaneously.
- Look through sub-module, you'll see it is essentially an AND gate and a FLOP.
- Now switch to top_module
- Keystrokes: Ctrl+E
- Search for the "Exercise_Submodule"
- Keystrokes: Ctrl+F
- Go to the insertion point shown below and type:
- sub_mod<CTRL-SPACE>
-
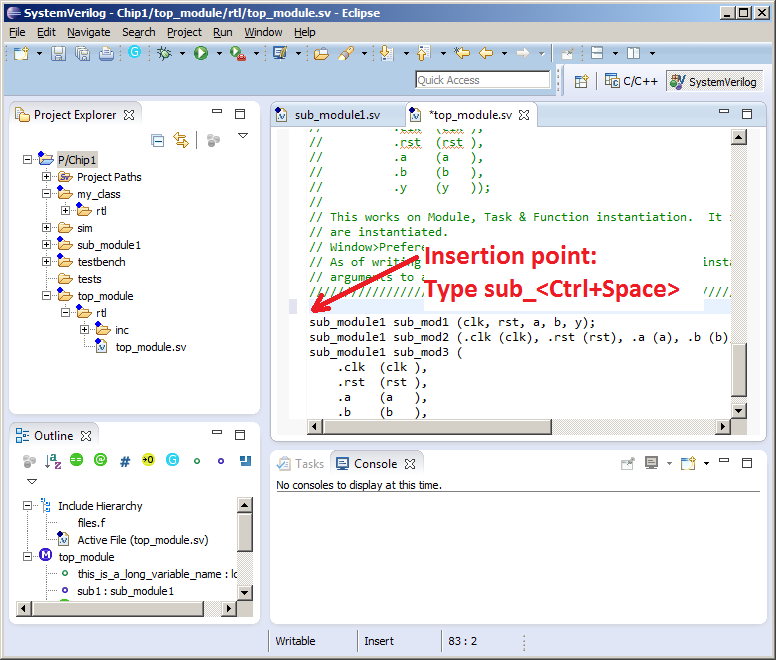
- You should see code that looks like one of the following depending on the preferences you have selected as described further down.
sub_module1 sub_module1 (clk, rst, a, b, y);
sub_module1 sub_module1 (.clk (clk), .rst (rst), .a (a), .b (b), .y (y));
sub_module1 sub_module1 (
	.clk  (clk ),
	.rst  (rst ),
	.a    (a   ),
	.b    (b   ),
	.y    (y   ));
The way modules, tasks & functions are instantiated is specified by your preferences: Window>Preferences>SVEditor>ContentAssist. For the above we have the following settings:
- Enable Named Task/Function Parameters unchecked. Line wrap 80, Max Task/Function Parameters Per Line 0
- Same as 1, but Enable Named Task/Function Parameters checked.
- Same as 2, but with Max Task / Function Parameters Per Line set to 1.
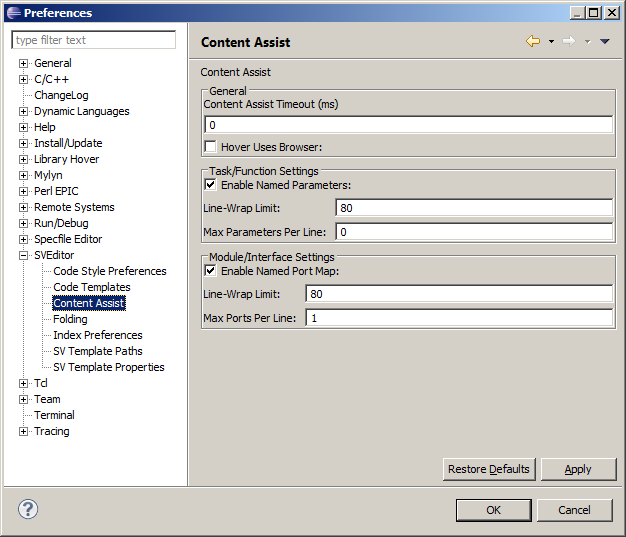
Instantiating Common Constructs - Ctrl+Space
You can save yourself some time by hitting Ctrl+Space on all common constructs (if, else, always_ff etc.). Try instantiate an always_ff block.
- Type " always<Ctrl+Space>"
- Select the always block you want, and hit Enter
These templates can be modified in the code templates selection of the preferences. At the time of writing this, the default templates were being put together, so these screenshots are going to be dated pretty quickly.
These can be edited/removed pretty easily as follows:
- Open up the SVEditor Code Template preferences
- Window>Preferences>SVEditor>Code Templates
- Edit/Add/Remove templates as you see fit
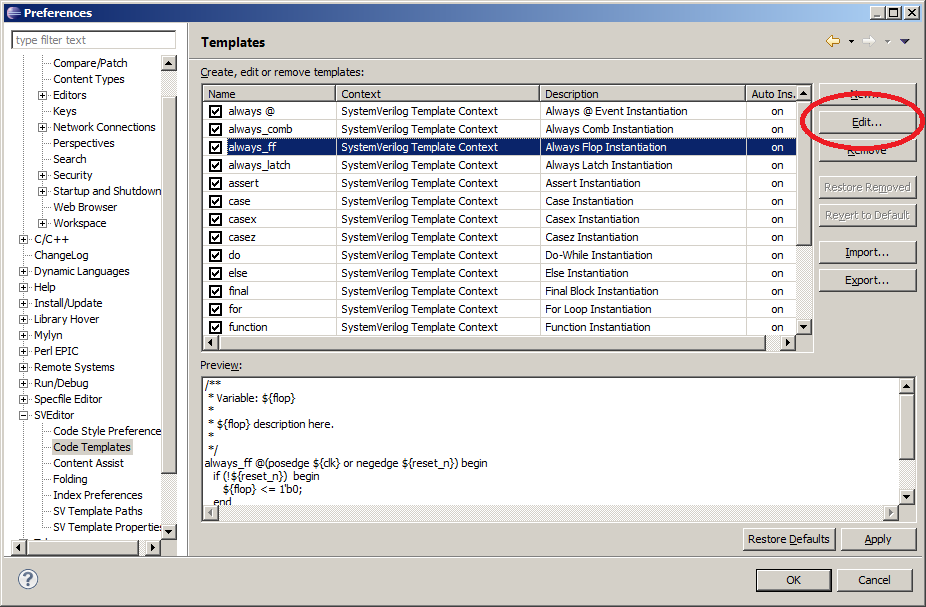
Class Member Instantiation
For you verification types, you'll love this one.
- Open up top_module.sv
- Ctrl+shift+R (or Ctrl+E)
- Search for Exercise_ClassCompletion
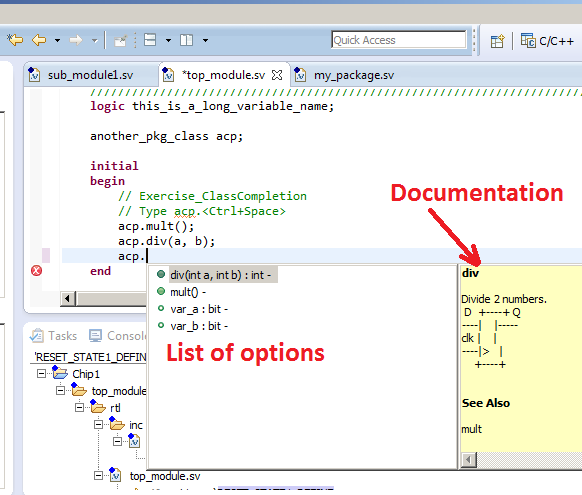
- In this area you'll see an instance of a class (another_package_class - acp) that has two functions in it.
- Call the function div within acp
- Type acp.<Ctrl+Space>
- You will see a pop-up within this dialog, which shows all the methods/variables available to you
-
- Select the function you want, hit Enter.
Code Completion - Alt+/
Another way to do code completion, similar to Ctrl+Space is to hit Alt+/. This differs from code completion in that the index isn't searched, but text is extracted from anywhere in the code above.
- Search for "Exercise_CodeCompletion"
- Keystrokes "Ctrl+F"
- Duplicate the assign statement there
- Assign this_<Alt+/>>
Each time Alt+/ is typed, the editor will cycle through items that match what you initially typed.
Indentation - Ctrl+I
Eclipse does a decent job with code indentation as you type. As you type, Eclipse will take it's best guess as to what you want the indentation to look like. Type in the initial block below, watching how Eclipse moves begin / end etc as you type (most leading whitespace will work out without having to Tab or Shift+Tab to fix it).
i.e. Don't indent / out-dent as you type. You'll find that as you type the "d" in "end" the end statement will out-dent automatically.
Indentation of pasted code
Try pasting this un-indented code into top_module. Eclipse will fix the indentation for you.
 initial
 begin
 if (j=1) begin
 k=6;
 end
 end
Fixing Indentation - Ctrl+I
If you come across a piece of code that is poorly indented, select this code (mouse or keyboard) and type " Ctrl+I". Eclipse will fix the indentation.
- Search for "Exercise_CodeIndentation" and follow the instructions in the comment.
BEWARE: If Ctrl+I is typed with nothing selected, the indentation of the entire file will be fixed, which is usually NOT what you intended!!!
Commenting out code - Ctrl+/
Code can easily be commented out.
- Select a couple of lines of code.
- Use your mouse
- Shift+Up or Shift+Down
- Comment these lines out
- Ctrl+/
- Put them back in again
- Ctrl+/
- You can also use block commenting (/\*...\*/) to comment out your code.
- Ctrl+Shift+/
- Restore it
- Select at least one character within the block that is commented out
- Ctrl+Shift+\
Opening a Random file in the Environment - Ctrl+Shift+R
This is so awesome it deserves it's own chapter!!!
Ctrl-Shift-R
Code Browsing
This is one area where Eclipse starts differentiating itself from a "normal" Editor. Because Eclipse parses your entire design, you are able to navigate through the design. The following sections describe the primary means of navigating your design.
Open Declaration - F3
Source code browsing is done using the F3 button. Open "top_module.sv" (Ctrl-Shift-R). Find where the module "sub_module1". Put your cursor in on the module name and hit F3. The file containing "sub_module1" should open up. Hitting F3 on any signal name, class instance etc. will take you to it's declaration.
Hit Alt-Left Arrow which will bring you "back in history", the same way as Firefox/Internet Explorer allow you to go back and forward through web pages you have worked through.
Ctrl+Q will take you to your last edit location, which is also huge.

Design Hierarchy
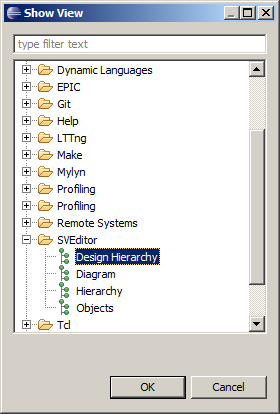
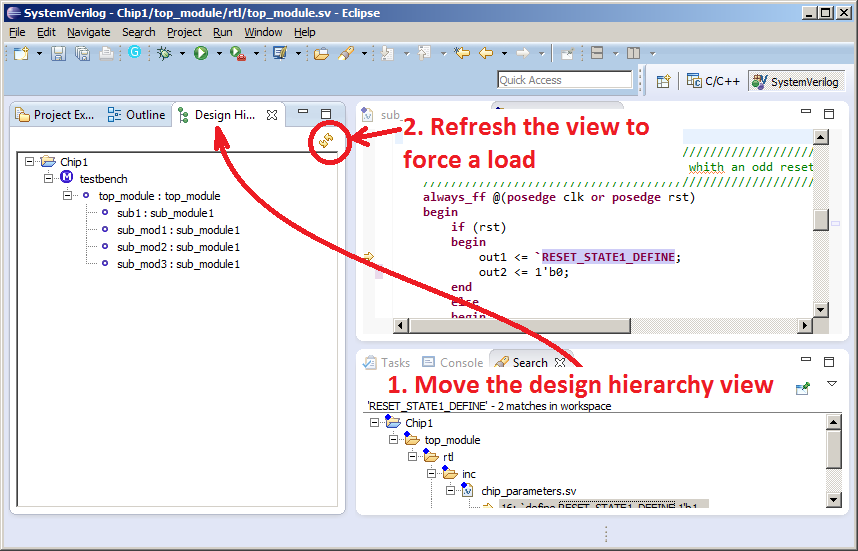
System Verilog Editor will show you the design hierarchy if Enabled. To open the design hierarchy view:
-
Window>Show View>Other>SVEditor>Design Hierarchy
-
- Move the view to on top of the project explorer view
- Hit the "Refresh" icon to populate the view
- Browse the hierarchy
- Double-click on any of the files, they should open
-
Class Hierarchy - F4
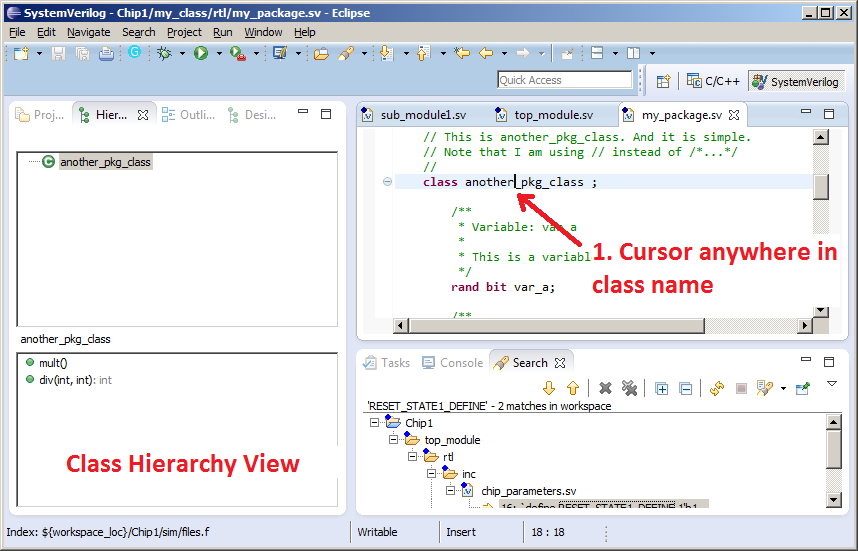
This one is for you verification types. You can browse class hierarchy as follows. Open up the package "my_package.sv". While the class hierarchy view is open, you can click up and down any class hierarchy that exists, double click on any of the class names, will open up the class. Clicking on any of the functions will take you to that function in the class.
- Ctrl+Shift+R
- my_package.sv
- Search for the class "another_class_package" using incremental search (Ctrl+J)
- Ctrl+J
- Type "another_pkg_class"
- While on the class name hit
- F4
Splitting Windows
This is an area that Eclipse doesn't do particularly well in my opinion. To split a window you have to go to Window>New Editor. This will create a duplicate buffer within the same window. Then you have to use your mouse (which kills me) to grab the tab and drag it either left, right, top or bottom to split the window. There are a couple of plugins that do a decent job doing this via the Keyboard if this is critical to you.
Find & Grep
This is pretty awesome. No longer do you have to go to the command line to do a search through your directory tree. Hit Ctrl-H. This will bring up a very complicated dialog box that looks something like this:
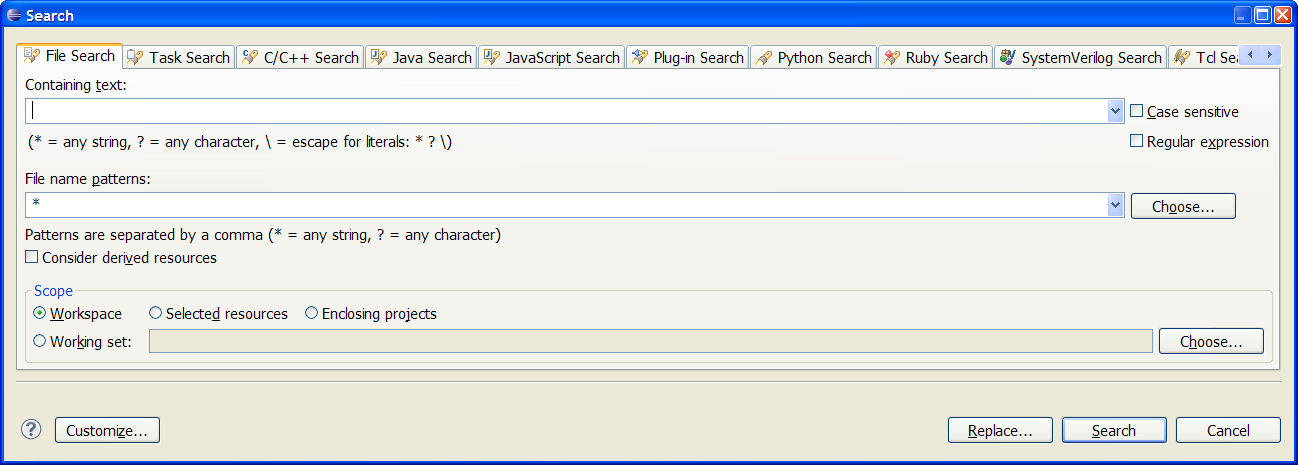
Every language that you have installed has its own search dialog. In general I have found that they are mostly redundant and I use the "File Search" tab exclusively. You can hide the other search boxes by clicking on the "Customize..." button in the lower left which will help keep you sane.
Another cool thing I accidentally discovered is that as you edit things, the search dialog box updates dynamically. Search for "RESET_STATE1_DEFINE". You should end up with a screen that looks like this:
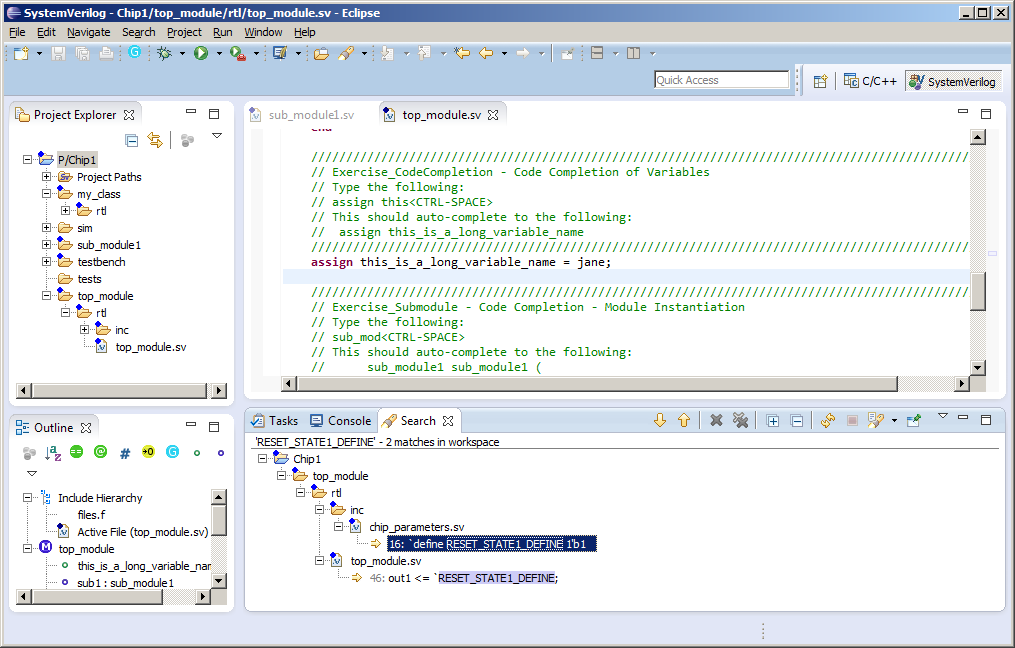
Now go ahead and double click on the one in top_module.sv. If you modify RESET_STATE1_DEFINE, the search box will update when you "save" and the entry will disappear.
Column Mode
Eclipse supports column editing! Of all the features in Eclipse, this function epitomizes my struggle with the transition. When I first tried Eclipse's column mode, I HATED it. Hated the way it works, the way to switch in & out of it was cumbersome (fingers couldn't learn the key sequence etc. etc.). Later on I discovered that there are things that it does that weren't available to me in my previous editor, and that my biggest issue with it wasn't that Eclipse was bad, it was just different.
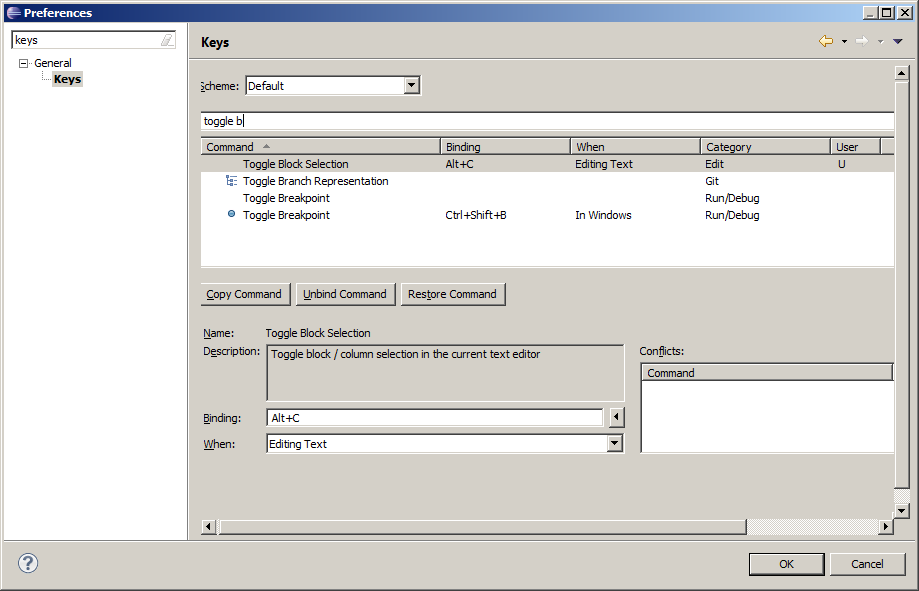
Firstly the default key-binding is pretty much never available... so it needs to be re-bound.
Window>Preferences>General>Keys. Re-bind Toggle Block Selection to Alt-C
Without further adieu...
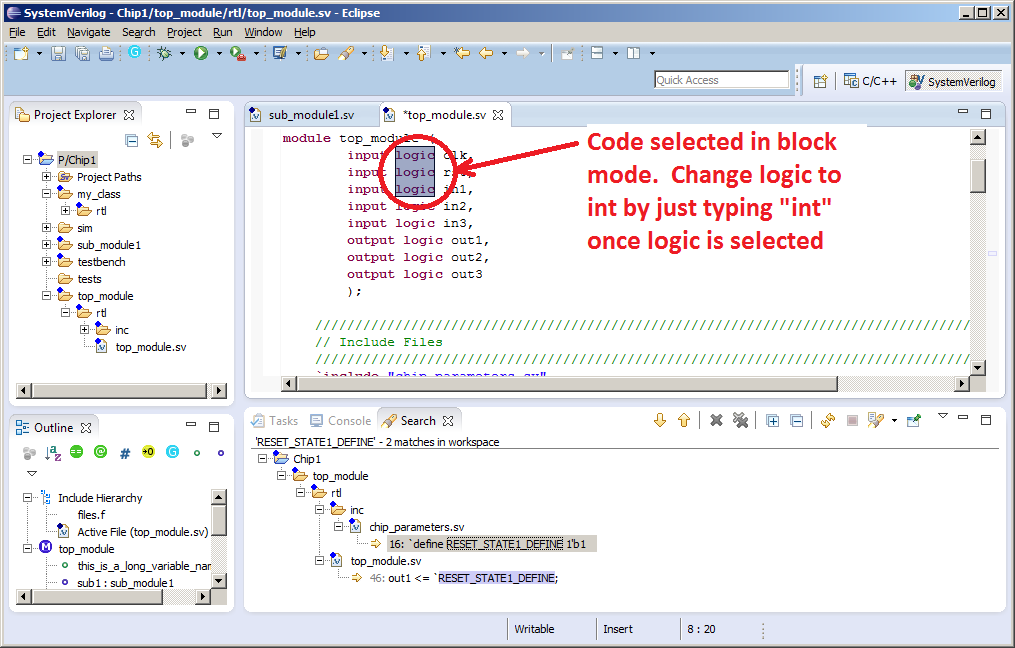
- Enter Column Mode ( Alt-C). You'll see your cursor change to a "+". Note that this is a toggle function, and Alt-C will get you back out again.
- Now select some code. VI users will recognize the "start position" and stop position concept, and the area selected is just the square of that code.
- Cut the code out Ctrl-X. The Block will disappear.
- Paste it back in Ctrl-V. Block will re-appear
- Go to the start of a line
- Type " Home" till you get there
- Select a couple of lines (you should just see a thin vertical strip appear).
- Shift+Down
- Start typing. The typing will appear on every line that you have selected. Hit
<BackSpace>. Backspace works on all lines too!
-
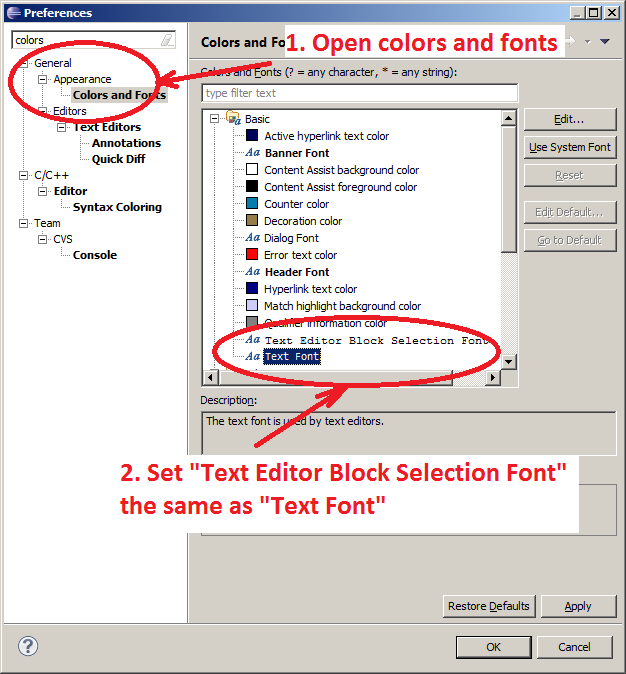
Likely the font changed when you switched into column mode. If this annoys you, it can be changed in the preferences:
- Open preferences
- Window>Preferences>General>Appearance>Colors and Fonts
- Set "
Text Editor Block Selection Font" the same as "
Text Font".
-
Diff'ing files
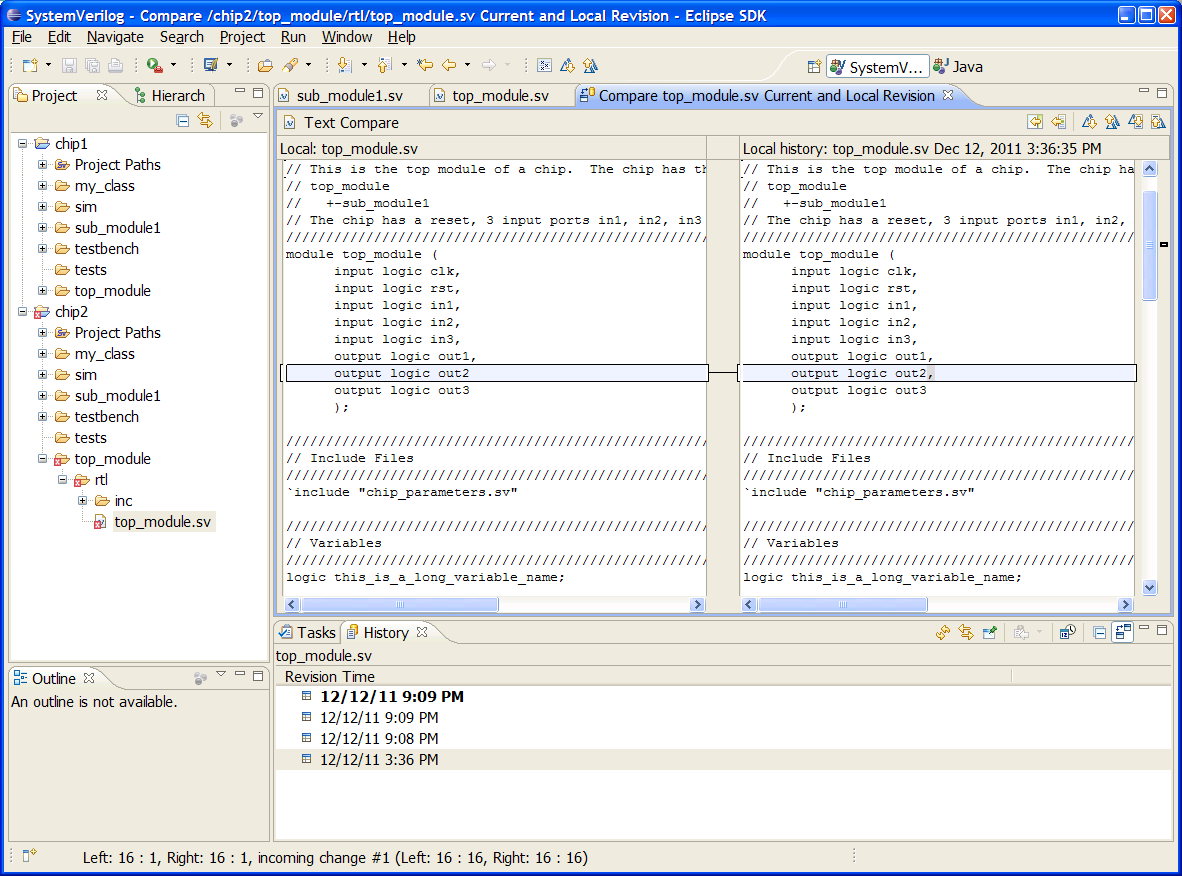
The in-editor diff feature is convenient. Eclipse keeps a history of the file as you are working. If you want to diff a file against an earlier edit, or against a version in the repository, it's easy as pie. Just Right-Click the file you are editing,
Compare With> Local History (or repository version if enabled) which will give you a screen that looks as follows. Click on the time you saved the file and the diff will appear. In this case between 3:36pm and December 12, 2011, I removed a comma after "out2".
Documentation pop-ups (DocHover)
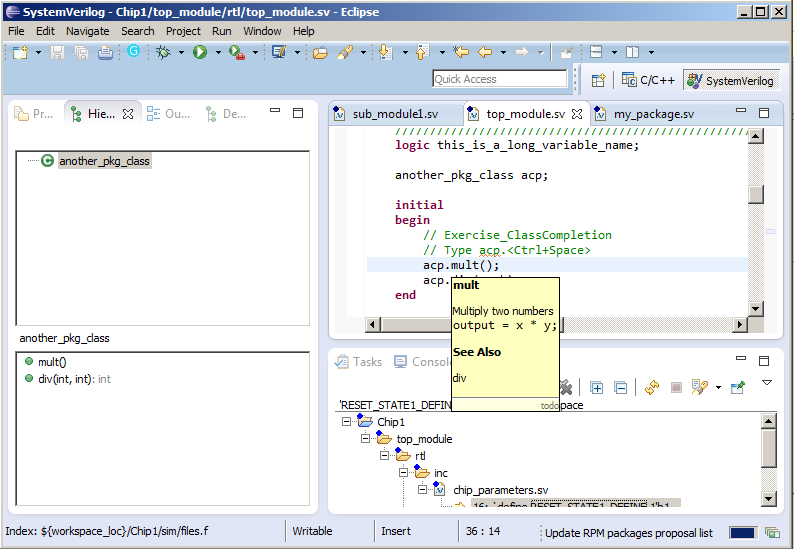
You will find that if you document your code using a "Natural Docs" style of coding, you will find pop-ups appear as you mouse over constructs. If you hold your mouse over the mult function in top_module as shown below, a pop-up will appear showing you a description of the function.
Jump to the mult function by putting your cursor on the mult instantiation and hitting F3. If you at the comment above the mult function, you'll see that this code has been replicated in this pop-up. The syntax is pretty intuitive, and the long term benefit to people unfamiliar with your code base will pay huge dividends in the longer term.
You can document variables, functions, tasks, modules etc. this way.
Multiple Projects & Environment Variables
Environment Variables were touched on earlier in the Tutorial. Now say I have 2 chips that I want to work on, semi-simultaneously. I don't want to have to go and reboot my machine each time I want to switch projects (think changing environment variables here).
In the following example I am going to a second design (Project). Note that the files.f in these two projects reference environment variables ( Ctrl+Shift+R>files.f).
It is also worth noting that you could do this in separate work-spaces, the setup would be the same. It's just cool to see both projects, with the same environment variables working simultaneously.
- File>New>Project>General>Project
- Next
- Set the "Project Name" to "chip2"
- Uncheck "Use Default Location" and browse to where you unzipped the project. In this should be something like "C:\<...>\chip2"
- Hit Finish
- You should now have a screen that has both Chip1 and chip2 loaded
-
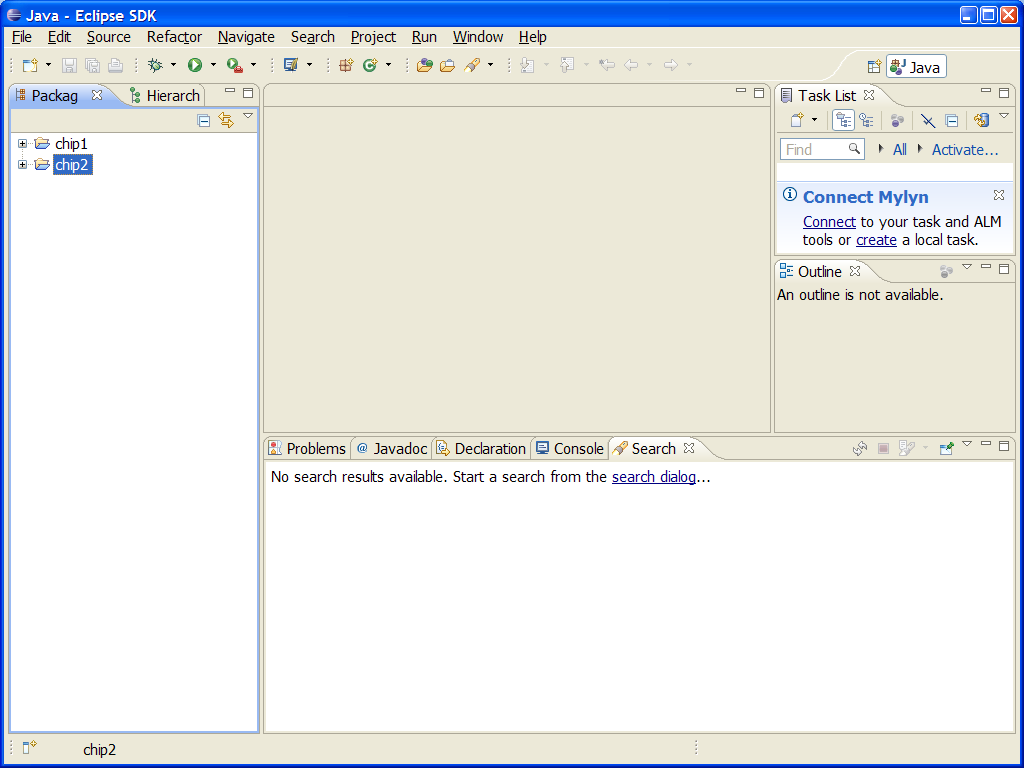
- Right Click on chip2>Properties>Resource>Linked Resources. Note that the environment variable "CHIP" references PROJECT_LOC, which should reference "C:\<somes_path>\chip2"!
- Now Right click on Project Explorer>chip2>Properties>SystemVerilog Project > Argument Files.
- Update this to point to "$\{workspace_loc\}\chip2\sim\files.f". You now have 2 different projects open, with their own "files.f"!
- Now have Eclipse compile Chip 2
- Project>Clean
Code Checking as you Edit
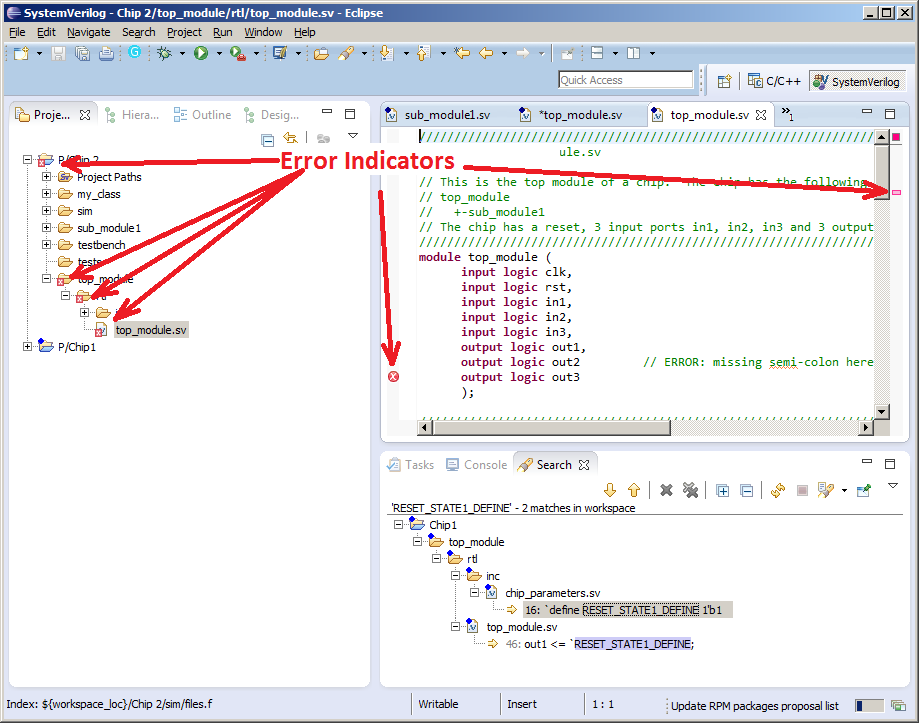
Now that you have opened the second project, you'll note that due to some poor coding I have an error in top_module. The "x's" in the Project Explorer window highlight files that have issues. This is kinda cool, makes it easy to find issues when you first update a file. The error checking isn't exhaustive, and at this point there are still some false errors, error misses etc. That said, it is quite nice to not have to wait for a 5 minute compile to discover that you forgot a semicolon.
As a rule, keep track of changes in errors, rather than errors that exist. If you find issues with the parser, please file a bug on Sourceforge. The parser is continually being improved.
Buffer Management
One of the things that you'll need to get used to when you first start using Eclipse is that you don't launch Eclipse to "Quickly edit a file". Eclipse is launched, a project is imported and Eclipse is left running permenantly. File / buffer management in Eclipse is superb. You'll quickly find you have > 20 files open.
Before starting this exercise open up lots of .sv files
- Ctrl+Shift+R
- Type in *.sv
- Select multiple files using Shift or Ctrl and either your mouse or keyboard
- Hit Enter
You can switch between any of the open files in any of the following ways:
-
Ctrl+Shift+R
- I use this, even if a file is open. If the file is already open, Eclipse will simply switch to this file
-
Ctrl+E
- Type Ctrl+E
- You will get a dialog that allows you to wild-card your way to any file you currently have open
- Type *odule
- Use keyboard / mouse to get to sub_module1.sv
- Type Ctrl+E
- Type top
- Hit the Delete button - this is a convenient way of closing open buffers!!!
-
Ctrl+Shift+E
- Type Ctrl+Shift+E
- Going to leave this dialog for you to play with on your own :-)
- Cycling between buffers
- This is similar to Alt+Tab for switching between windows applications on your PC
- Type Ctrl+F6, releasing F6 but keeping Ctrl depressed
- You should see a dialog pop-up that shows you a list of buffers, in the order they were most recently used
- Press F6 till you get to the buffer you want to edit
- Release Ctrl at this point
- Type Ctrl+Shift+F6
- Release F6, while still depressing Ctrl+Shift
- This will cycle backwards through buffers
- Note: These are often re-bound to Ctrl+Tab and Ctrl+Shift+Tab
Project Management
In Eclipse terms a project is a group of related files. As a Verilog designer / verification engineer, this can be:
- A chip
- A piece of synthesizable IP
- A piece of verification IP
- A piece of IP that contains all deliverables (verification, RTL, constraints etc.)
As designers/verification engineers we continually switch between "Projects" so project management is an important part of what we do. Projects can either be
- Closed and opened (still visible within the workspace)
- Deleted & Imported (Removed from the workspace)
Not sure if there is a significant advantage to using one technique or the other. Personally I close/open projects that I commonly switch between, and delete ones that I am not going to be using in the near future.
Closing a project
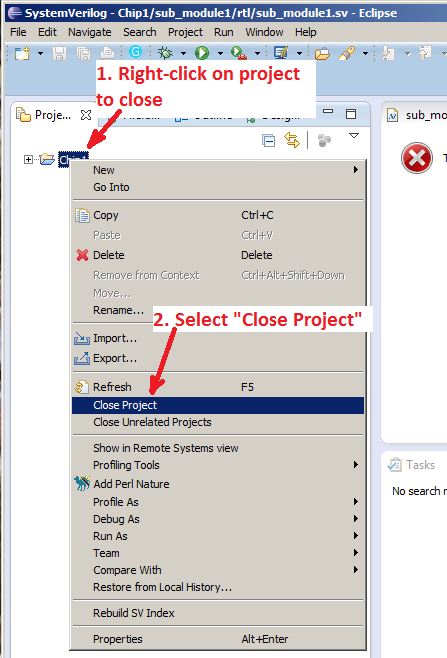
To stop Eclipse tracking a given project in a workspace (Ctrl+Shift+R will no longer bring up files from that project etc) without removing the project entirely from the workspace:
- Select the project in the project Explorer window
- Right-click on the project name and select " Close Project"
Opening a closed project
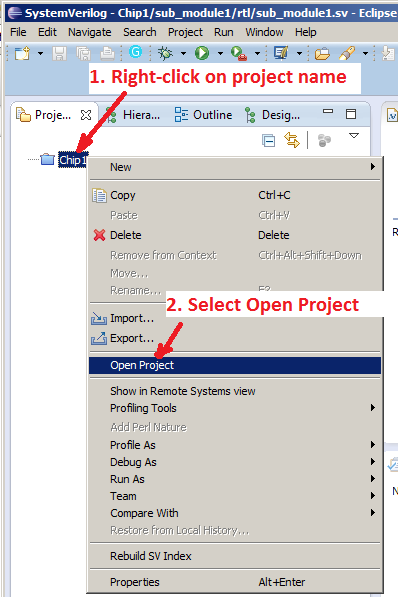
- Select the project in the Project Explorer window
- Right-click on the project name and select "Open Project"
- Don't forget to re-build it by Project>Clean
Removing Projects
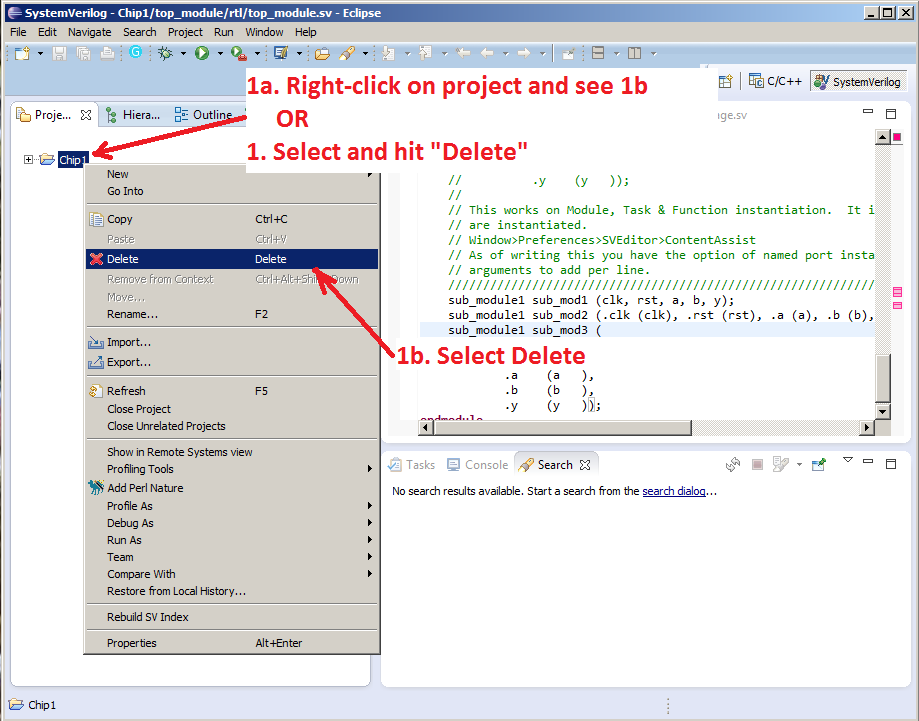
From time to time you may want to remove a project from the Eclipse workspace you have open. In the process described below, Eclipse will simply stop tracking the project at all. This does not delete the .project, or .svproject files that Eclipse uses to describe the project. All the work you have done to this point is NOT lost, it is merely not tracked.
- Selecting the project in the Project Explorer
- Hit "
Delete"
-
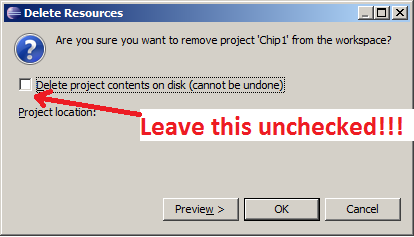
- The dialog that comes up here is the tricky one. Do
NOT check the "Delete project contents on disk". This option is useful for people who create and control their entire projects (from check-out to check in and so on) from within Eclipse. If you check this check-box, the files on the file system will be removed.
-
Re-importing projects that have been deleted
This is trivial.
- Import the project
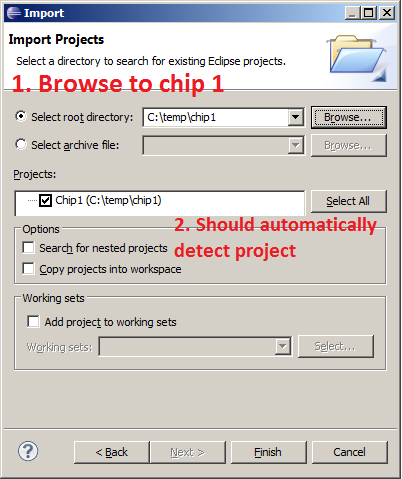
- File>Import>General>Existing Projects into Workspace
-
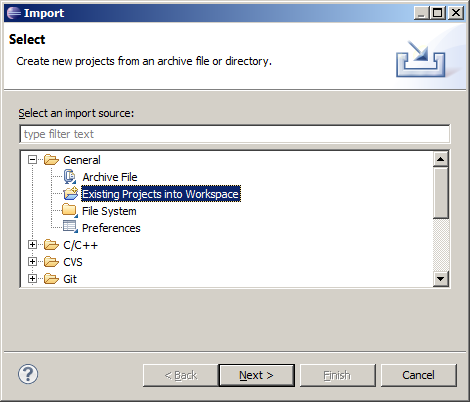
- Browse to the top of your project (i.e. where .svproject and .project reside). In this tutorial, this will be the directory where "chip1" resides
-
- Hitting "Finish" should complete the project import
- Force a re-compile (Re-index) of the project
- Project>Clean
Other Stuff
Code Colorization
Code colorization isn't anything new. Eclipse can be configured to color things any way you like. What is pretty cool though is that when you copy & paste into an email, the formatting is usually retained as follows:
////////////////////////////////////////////////////////////////////////////////////////////////////
  // FF that is a serial shift register with an odd reset state
  ////////////////////////////////////////////////////////////////////////////////////////////////////
  always_ff @(posedge clk or posedge rst)
     begin
        if (rst)
        begin
           out1 <= `RESET_STATE1_DEFINE;
           out2 <= RESET_STATE0_PARAM;
        end
        else
        begin
           out1 <= in3;
           out2 <= out1;
        end
     end
Some Eclipse Concepts
Workspace vs. Projects
A Project is the equivalent of a chip or a design you are working on.
A Workspace, is an Eclipse concept which specifies:
- A location to do caching
- A set of window-layouts
- A set of Projects that are opened (there can be multiple projects open at any given time)
- Switching between workspaces is as easy as File>Switch>Workspace
A common question is "Should I have multiple Workspaces with a single project per Workspace or a single Workspace with multiple Projects loaded. I can see arguments for both scenarios, and have done both over time. I don't see a significant advantage to either usage model.
| Action | Single Workspace, Multiple Projects | Multiple Workspaces, Single Project |
| Switching Chips | Easy: Open, close, import projects | Easy: File>Switch Workspace |
| Different Revision Control Systems | Not Possible | Easy: Revision control stored as part of workspace, will be good to go |
| Different Language Types | Easy: Can edit both languages, one will be primary | Easy: Seperate workspaces, easy to switch contexts completely |
Refreshing the Design / Workspace / SV Database
Once in a while you may choose to do things outside of the workspace (copy in a directory tree etc). F5 is your friend to get Eclipse to do a refresh on the disk. The time I most commonly use this is when I do a fresh check-out / update of the entire design outside of Eclipse. Just go to the Project Explorer, and hit F5. Eclipse will go off and re-build the file tree.
At times like this it is also worth re-building the System Verilog Database. Note that this is a separate activity from a file-system refresh.
- Make sure you are in the System Verilog Perspective (ribbon near the top right of the screen)
- Project>Clean
Eclipse will automatically "Rebuild the SV Index" from time to time (when file system differences are detected). You can disable this in the SV Preferences Screen.
Window>Preferences>SVEditor>Enable Index Auto-Rebuild
Eclipse Preferences
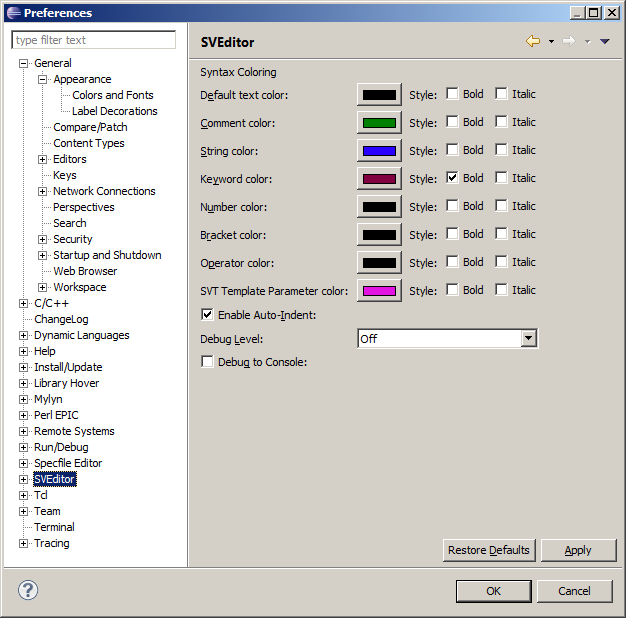
Eclipse preferences are managed in Window>Preferences. It can be somewhat difficult to find a specific preference. The search box is invaluable. Here are some of the commonly requested preferences:
- Line Numbers: General>Editors>Text Editors>Show line numbers
- Tab Width: General>Editors>Text Editors>Displayed tab width
- Spaces vs.Tabs: General>Editors>Text Editors>Insert spaces for tabs
- Key bindings: General>Keys
- Colors/Fonts:
- General>Editors>Appearance>Colors and Fonts
- General>Editors>Text Editors>Appearance color options
- General>Editors>Text Editors>Annotations
- SVEditor>Syntax Coloring
- Search for 'Color'. Each language has it's own, semi-independent overrides
- File associations:
- General>Editors>File Associations
Revision Control Support
Eclipse does an excellent job of connecting to various revision control systems. Personally I have used Git and CVS, and both are well supported.
Short Cuts
Here are a list of short-cuts that I have started using which are handy:
| Key | Shortcut |
| Ctrl-L | List of shortcuts |
| Text Manipulation | |
| Ctrl-Alt-Up/Down Arrow | Copy selected lines above / below. Didn't know what to make of this feature initially, but I find myself using it a ton. I use it in combination with Alt-Up/Down arrows which move the code up or down. |
| Alt-Up/Down | Move selected code up or down in the file |
| Alt-Shift-A | Toggle Column Mode |
| Shift Arrows, Ctrl-Shift-Arrows | Select stuff |
| Ctrl+/, Ctrl+Shift+/, Ctrl+Shift+\ | Controls commenting |
| Buffer Management | |
| Ctrl-Shift-R | Open any file in library |
| Ctrl-E | Easily switch between open files |
| Ctrl-Shift-E | Similar to Ctrl-E. This pop-up is a good window to use to cleanup your buffers. Hitting delete here will close the buffer, without wiping it off the disk. |
| Ctrl-W | Close current buffer |
| Ctrl-F6 | Switch between tabs in an editor, the same way you can switch between programs in Windows, or Tabs in your favorite Browser. Most people (myself included) remap this to "Ctrl-Tab" |
| Alt-Left/Right Arrows | Browse through history, similar to browsing through history in a web-browser. |
| F5 | Refresh File / Database |
| Code Manipulation | |
| Ctrl-Space/Alt+/ | Code Complete |
| F3 | Jump to definition |
| Search / Replace | |
| Ctrl-H | Find & Grep dialog box |
| Ctrl-J | Incremental Search |
| Ctrl-F | Search / Search & Replace dialog box (irritating I know. Surely this is something that is going to be re-vamped at some point in the future) |
| Ctrl-K, Ctrl-Shift-K | Search on whatever I have selected, or if nothing selected, search again. |
Changing your Keybindings
Like any good editor, key bindings can be remapped. For the EMACS & VI users (which is pretty much all of us) there are plugins that will allow you to map your key bindings to EMACS & VI key bindings. My initial reaction to you is "don't".
Give the tool a chance. The key bindings in Eclipse are pretty good. It'll take you about 2 weeks to re-train your fingers, and in many ways the key bindings are more efficient than VI / EMACS (i.e. do the same stuff with less typing).
If after 2 weeks you discover that your fingers can't be re-trained, take your chances and install the plug-in.
Keybindings can be changed at:
Window>Preferences>General>Keys
Preference Management
Preferences are stored in your workspace. As you switch between work-spaces (or occasionally decide you HAVE to delete your workspace for whatever reason) you'll find all your key-bindings, colors etc. don't come across automatically.
This is both good and bad. On the one had you can have a different color scheme for each workspace / language you typically code in, on the other you need to manage them. Fortunately this is really simple.
You should back-up your preference file from time to time. To do this you will need to export your preferences.
- File>Export>General>Preferences
- Save the preference file somewhere you can find it easily (MyDocuments / or your home area \~).
Importing your preferences in a new workspace is just as easy:
- File>Import>General>Preferences
- Save the preference file somewhere you can find it easily (MyDocuments / or your home area \~).
Updating Eclipse
The SVEditor plugin is being actively developed. Updates based on user feedback are released fairly frequently. To update both your Eclipse installation and all installed plugins:
- Help>Check for Updates
To update a specific plug-in:
- Help>About>Installation Details>Select the plugin>Update

